
The toolbar above the candidate table is how you turn a long list into a focused work session.
The Toolbar
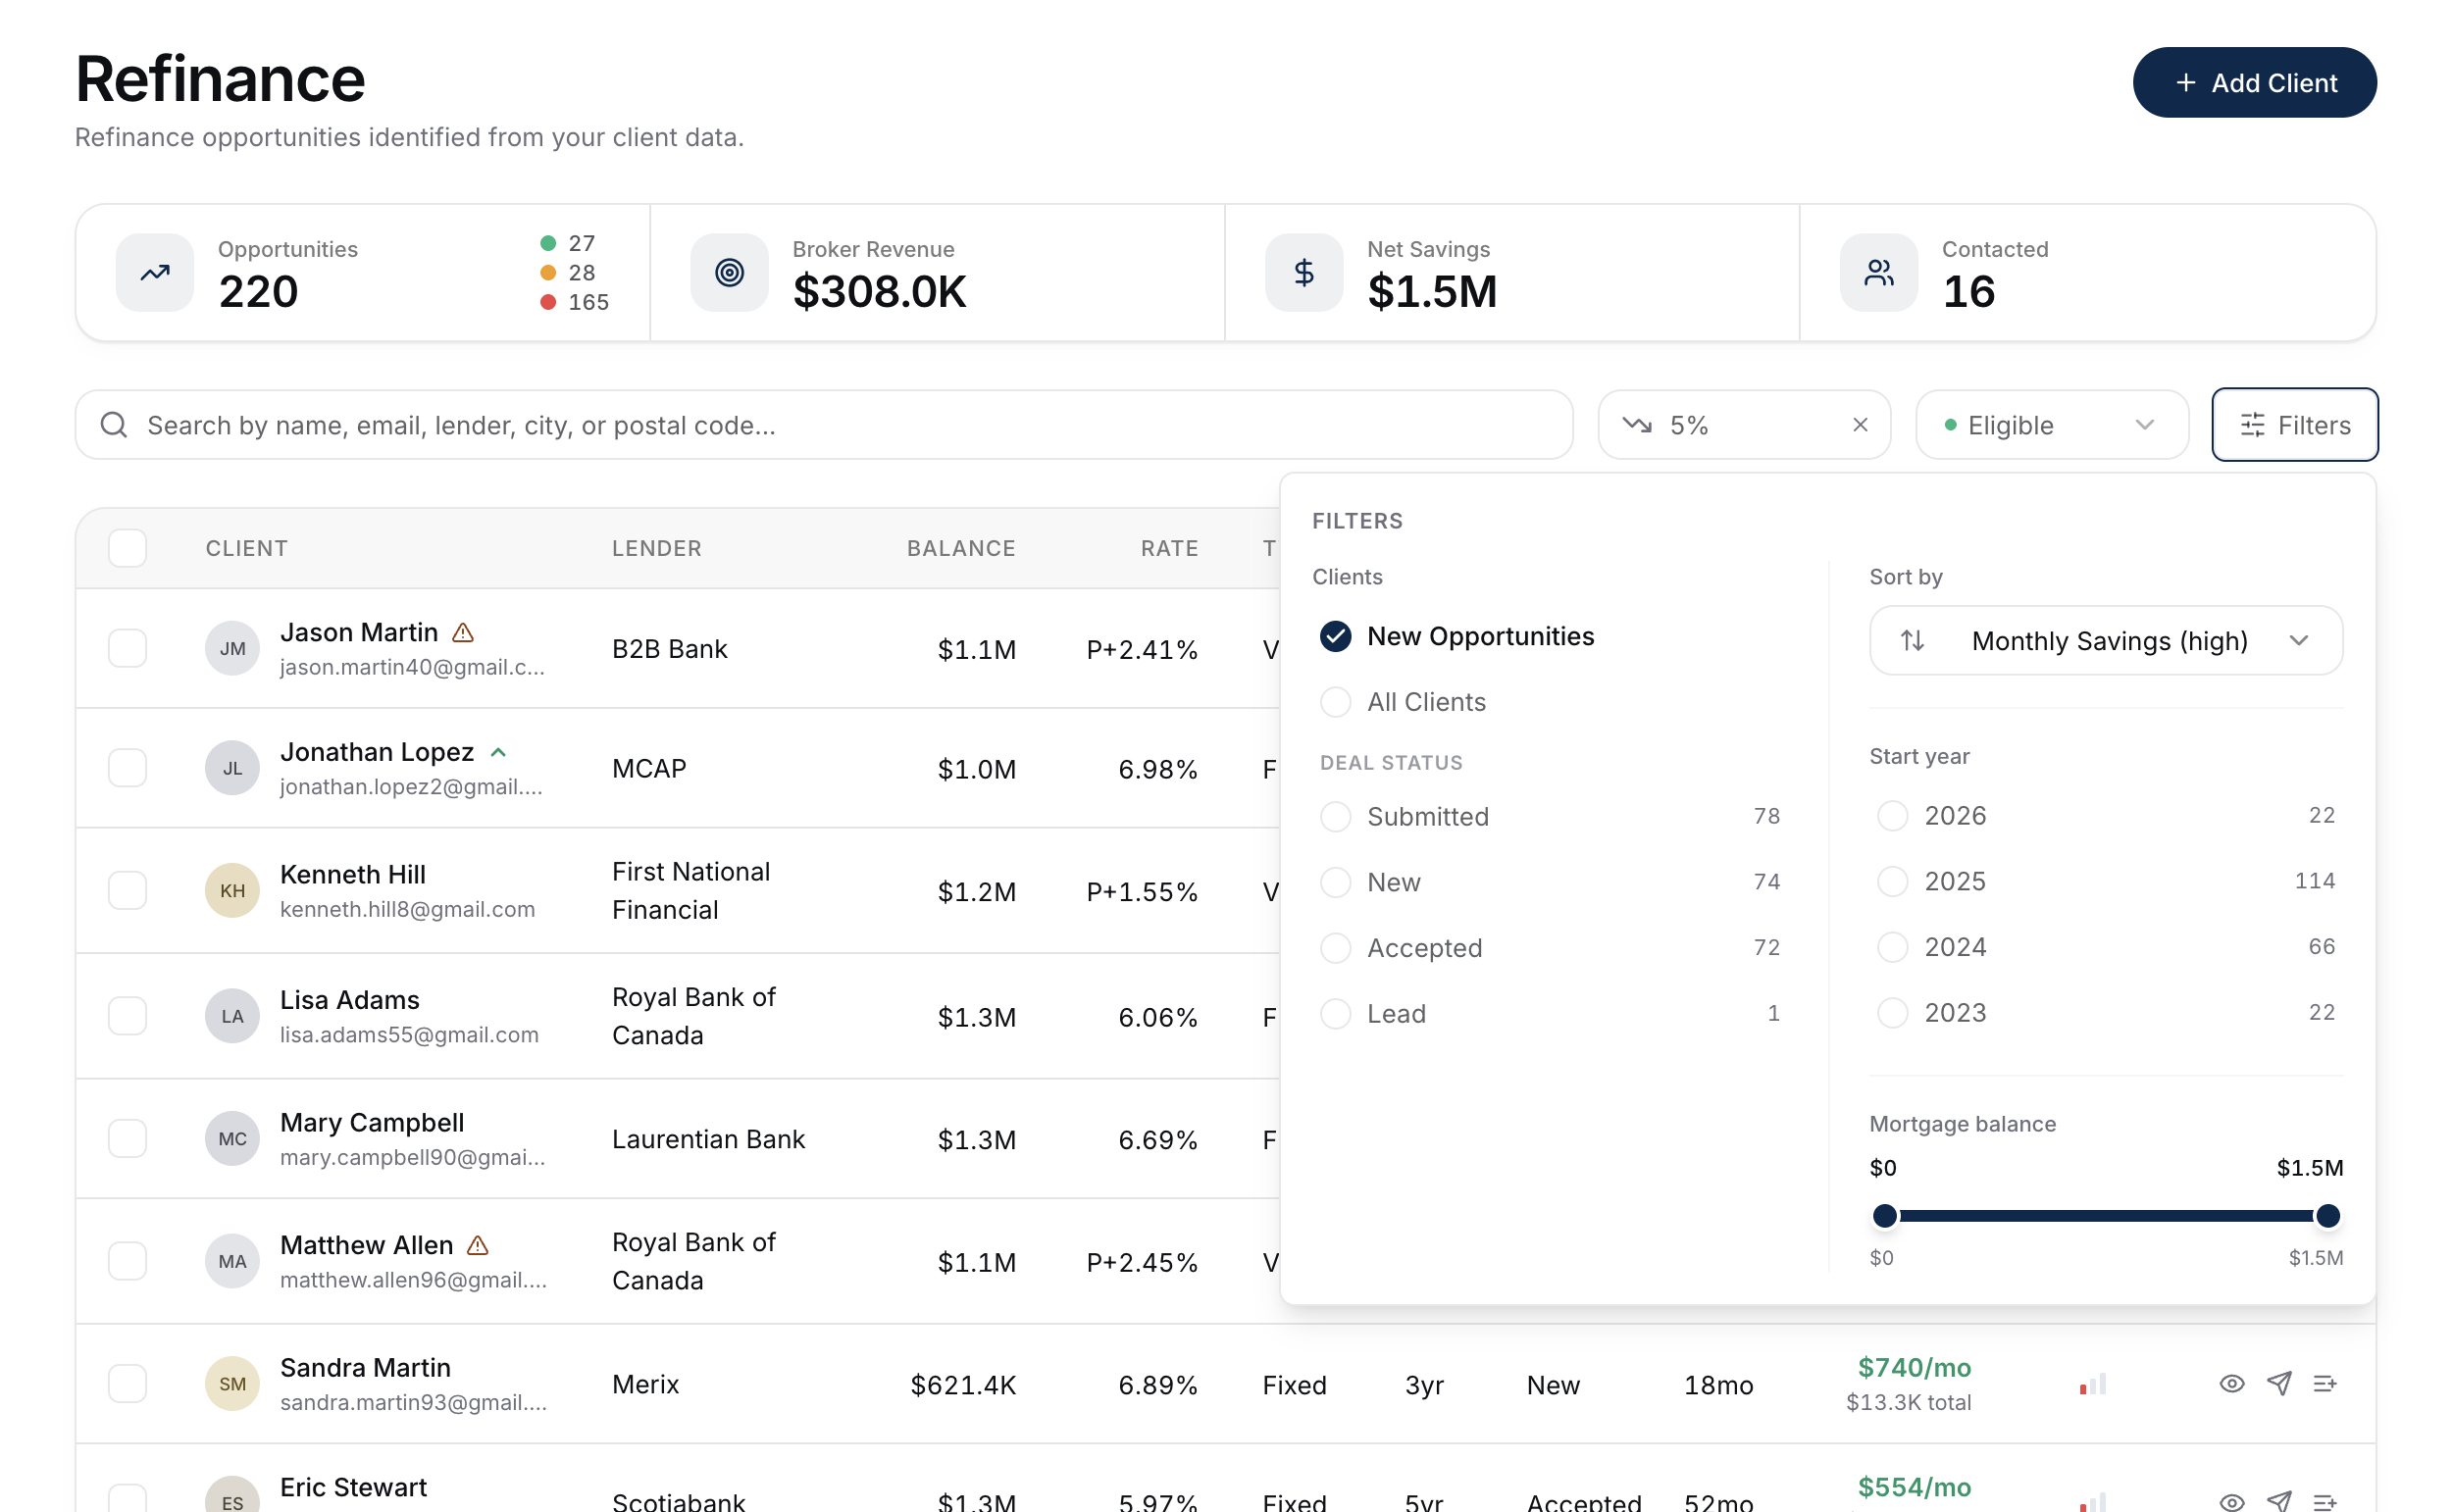
Five controls sit in the row above the table:
- Search - matches client name, email, lender, city, or postal code.
- Saves at rate - type a rate (say 4.19) and the list narrows to clients who would save by refinancing at it. Press enter or click away to apply; the small x clears it.
- Tier - all tiers, eligible, in review, or not eligible.
- Sort - reorders the list; see sorting below.
- Filters - opens the filters panel. The badge on the button counts how many filters are currently active.
Inside The Filters Panel
The panel has two columns. The Clients column on the left:
- New Opportunities and All Clients are a mutually exclusive pair. All Clients is the default and shows everyone, including clients you've already reached out to - they stay on the list with a Contacted marker at the end of their row, matching how renewals works. New Opportunities is an opt-in that narrows to clients you haven't contacted yet.
- Deal Status - a dropdown listing every status in your book (imported or set when adding clients), each with a count. It reads All statuses when nothing is ticked. Tick as many as you like - submitted and accepted at once, for instance - and the button shows how many are selected.
- Minimum Deal Age - type a number of months to keep only deals at least that old. Age is measured from the mortgage's start date to today, so entering 12 drops anything originated in the last year. Leave it empty (or 0) to show every age. Useful when you only want to work seasoned deals.
- Start Year - a checklist of mortgage start years with counts, so you can pull up "my 2023 deals". It only appears when your data has start dates.
The right column:
- Lender Type - a checklist of the broker-facing lender categories: A-Lender, Alt / B-Lender, Private / MIC, Reverse Mortgage, and Unassigned. The type comes from the client's current lender (the one in the Lender column), so ticking A-Lender narrows the list to just your A business. Clients whose lender is missing or unrecognized fall under Unassigned rather than dropping off the list.
- Additional Options → Hide high LTV% - hides clients flagged as high loan-to-value (over the 80% conventional refi cap after penalty), where a standard refinance likely won't qualify. Off by default, so nothing is hidden until you turn it on.
- Additional Options → Only Linked Deals - narrows the list to clients who hold more than one deal with you, such as a second mortgage or another property. Linked deals are matched on the client's email address, and the match looks across your whole book rather than just this page, so a refinance whose only other deal is a renewal still appears here. Useful when you want to review everything a client has with you and update it all in one pass. Off by default.
- Mortgage Balance - a dual range slider, useful if you're targeting a certain deal size.
Clear all in the panel header resets everything back to defaults. Status and start-year counts are scoped to the refinance list, so they reflect what's actually on this surface.
Sorting
Sorting lives in the Sort select in the toolbar, just left of Filters - column headers aren't clickable. The options:
- Monthly Savings high or low. High is the default - biggest opportunities first.
- Total Savings high or low.
- Equity high or low.
- Engagement high or low - appears once your email is connected.
- Name A-Z.
- Newest first - most recently added clients.
What Engagement Actually Measures
The engagement score is a rollup of how active a client has been with your previous touches. It factors in:
- Email opens on outreach you've sent.
- Link clicks in those emails.
- Replies (and whether sentiment was positive or negative).
- Equity report interactions (when they updated their valuation, balance, or address from a report).
Higher engagement = warmer lead. Sort by Engagement (high) when you're picking who to manually touch.
A Useful Recipe
To find your next best manual outreach:
- Type the rate you can actually offer into Saves at rate, so only clients who'd come out ahead remain.
- Set the tier select to Eligible.
- Set Sort to Engagement (high) - or Monthly Savings (high) if email isn't connected - and open Filters to turn on New Opportunities so clients you've already contacted drop off.
- Work the top of the list.
Bulk Select And Delete
Each row has a checkbox, and the checkbox in the table header opens a small menu with two choices: Select this page, which ticks just the rows in front of you, and Select all, which selects every client matching your current filters - all pages, not just the one you're looking at. So you can filter the list down, choose Select all, and act on the whole filtered set at once. Choosing the checked option again clears the selection, and you can untick individual rows to leave specific clients out.
When anything is selected, a bar appears at the bottom of the screen showing the count, with Clear and Delete. Delete asks you to confirm, then permanently removes the selected clients - their profiles, reports, and outreach history. Clients with an open EDD case on file are kept (close the case first); everyone else in the selection is deleted.
What To Do Next
- Click into a candidate from your filtered list: Reviewing A Candidate.
- Send to one of them: Sending A Candidate Report.